header

header

Saturday, 7 November 2015

Metropolis piece, leaded up

I never thought I'd see the day! I've finally gotten all of the firings done on the Metropolis piece and got it leaded up yesterday. I'm pleased with how it came out.


"Metropolis" painted and fired stained glass by Maria McMahon
Detail, "Metropolis" painted and fired stained glass by Maria McMahon
It's the biggest panel I've ever made, over a meter tall. I'm going back to the studio today to cement this piece, the repaired Dragon and Girl piece, (I don't know if I mentioned, the wing piece of the dragon got broken when the piece was being framed. So I had to take it apart, re-do the wing, and get it all leaded up again. I finished it all yesterday as well) and the four angels playing instruments panels I made for the Parade Artists Christmas show

"Adeste Fidelis," painted, enamelled and fired stained glass by Maria McMahon
The four angels are on flash glass, which was acid-etched and then painted & fired. I added enamels on the dresses and hair, and silver stain on the halos and stars. Unfortunately the picture really doesn't do it justice, I'll have to take more pictures after I get them all cemented and cleaned.

So, the Christmas show, It's the first time I'll be showing my work in public! I'm going to be showing the four angels, the Metropolis piece, the Dragon and Girl piece, and several sea shells pieces (which The Scotsman is busy framing, he's so cool!) Last but not least, I'm also going to be selling these snowflake pieces I've made with acid-etched flash glass and textured glass:


Hopefully someone will buy something! Wish me luck....
Pin It Now!

Monday, 7 September 2015

She sells sea shells

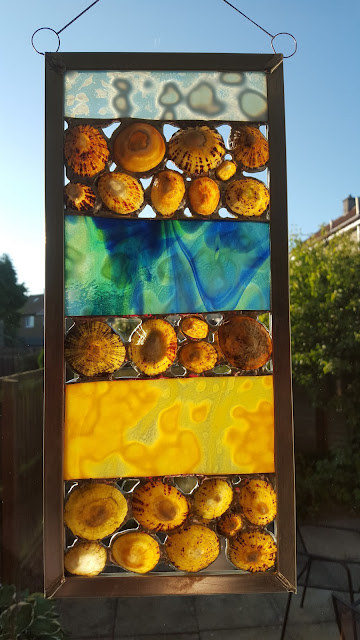
Hi all, I've been working away on several projects in the studio. One of my most recent projects is a series of panels in the Tiffany style. These panels incorporate antique glass and limpet shells I gathered on the beaches of Scotland, mostly on the west coast and Inner Hebrides islands.

This is the first one I made, it is not exactly square and is more of a proof of concept than anything:

Scottish sea shells proof of concept panel by Maria McMahon
I had a talk with The Scotsman about how I could more easily get the panel straight and square, so he built me an adjustable wooden jig (how I do love that man).

The jig allows me to lay out the coppered shells and glass pieces in a perfectly squared space and solder them in place, knowing that the angles were all straight. The second piece came out a lot more exact (although unfortunately the photo did not!):

Scottish sea shells panel by Maria McMahon

Here are the two pieces together, for comparison:

Scottish sea shell panels by Maria McMahon
 
I'll be making lots more of these for the Christmas show, I hope someone wants to buy one (or several.) Wish me luck!

Still plugging away on the Metropolis piece, I'm starting to see the light at the end of the tunnel with that one. I think it's a few more firings away, then I just have to lead it up and figure out how I want to display it. Maybe I'll get The Scotsman to build a light box for it? Pin It Now!

Monday, 10 August 2015

Metropolis stained glass - More Work in Progress Pix

Hi all, it's been a while! I've been getting back into the studio on weekends recently (had to take some time off due to circumstances beyond my control.) The Metropolis piece is very nearly ready to lead up. Here are the latest work in progress images:

Detail, "Metropolis" painted and fired stained glass by Maria McMahon

Detail, "Metropolis" painted and fired stained glass by Maria McMahon

"Metropolis" painted and fired stained glass by Maria McMahon

Detail, "Metropolis" painted and fired stained glass by Maria McMahon
I re-did the background, as the multiple slanting pieces I had originally cut were going to be impossible to line up correctly when it was time to lead up.

I'll post more when this piece is finally done!

Pin It Now!

Monday, 19 May 2014

Dragon and Girl Leaded Up!

Hi all! Over the weekend I finally got my Dragon and Girl piece leaded up.

Dragon and Girl stained glass by Maria McMahon, 2014


My (amazing, talented, wonderful, and - most importantly - very patient) teacher Brian Waugh helped a lot with this process and basically prevented me (very helpfully) from making a complete botch of it. As I would almost certainly have done if I'd attempted it on my own!

Those are Brian's hands. Not pictured: Your Narrator, in fetal position on the floor, wailing.

It was a very tricky leading up job, as the acid etching and multiple firings had made some of the pieces of the glass shrink and change shape. There was lots of grinding involved and it took us several hours to get the job done.


A very tricky leading process due to glass shrinkage from multiple firings

Can I just say that, while I like the piece and everything, I'm kind of tired of looking at it? It seems like I've been working on it for the past few ages! (OK, OK, so I have been working on it for the past few ages.) That being said, I am pretty pleased with the way it came out. I felt I didn't do too bad a job of the soldering. The leafy border is nice.

Leafy Border detail, Dragon and Girl stained glass piece by Maria McMahon

 Here are some more detail shots:

Girl detail, Dragon and Girl stained glass piece by Maria McMahon, 2014

Dragon detail, Dragon and Girl stained glass piece by Maria McMahon

All that still needs to be done is to cement it, give it a final cleaning, and get a frame contructed for it. The Scotsman has very kindly agreed to make the frame. Best husband ever!

Then, hopefully I'll be able to wheedle somebody into buying it. Anybody wanna buy it? Bueller? Bueller? Bueller?


Pin It Now!

Monday, 28 April 2014

Dragon and Girl: Ready to Lead Up, and Metropolis Beginnings

Hi all! Long time no write. Darn this having to work for a living thing, it sure does get in the way of my glass hobby!

I've been able to get into the glass studio sporadically on weekends, and have finally finished the last layers of paint and enamel on my Dragon and Girl piece. Now it's ready to be leaded up, and then maybe someone will want to buy it (ha ha.) Anyone want to buy some stained glass? (wheedle)

Dragon and Girl: acid-etched, painted, enamelled, and fired glass. By Maria McMahon, 2014

I used amber and then ruby red enamel on the dragon, which came out a nice kind of bronze colour over the brown paint. The little girl's hair is amber enamel, and her flowers are blue, amber, and ruby red enamel.

You want some close-ups? Here you go!

Detail, Dragon and Girl: acid-etched, painted, enamelled, and fired glass. By Maria McMahon, 2014
Detail, leafy border, Dragon and Girl: acid-etched, painted, enamelled, and fired glass. By Maria McMahon, 2014
And now on to my new piece. It's inspired by the classic 1927 ur-science fiction film "Metropolis" and its iconic robot poster. Here's the poster:


I started with smooth amber Cathedral glass. The piece is 1 meter tall (a little over 3 feet) and 50 cm wide. This will be the biggest piece I've ever done, so wish me luck!

Here's the face, which I started last weekend. The stripey look in the background is the camera catching the light table's lights strobing (it happens too fast for the eye to see, but the camera catches it.) It's propped up on 3 pieces of blu-tack. Also pictured: a little bit of my badger brush!

Work in progress, "Metropolis" stained glass, painted & fired glass by Maria McMahon 2014

Then this weekend just past, I got some more work done on the face and the body, as well as the first matte layers on all of the background pieces:

Work in progress, "Metropolis" stained glass, painted & fired glass by Maria McMahon 2014
It's not exactly true to the poster, it's kind of my own take on it. The actual glass piece is a lot taller - the top pieces (where it's going to have the "Metropolis" lettering) were all in the kiln being fired when I took these pictures. I do intend to include all of the buildings in the background as well as the lettering at the top. It will all be done in paint, and I intend to keep the piece a monochrome, sepia colour like the poster.

This is a kind of different subject for a stained glass piece, I know. I was talking with The Scotsman about it, and came to the conclusion that iconic film imagery seems to fire me up (no pun intended, ha!) a lot more than Biblical stories. No offense to the Bible, but Bible stories and characters have been done in glass for millennia now!

The Metropolis robot was so amazing and ahead of its time, and led to so many other famous film robots (C-3PO, I'm looking at you!) that I feel it has the same kind of resonance for me as images of the Archangel Gabriel might have had to people in Medieval times. Stained glass has always been about using images to tell stories, and I'm following that tradition - telling stories that I find interesting.

There's still a huge amount of work to be done on this piece, but I'm pretty pleased with the way it's coming along. I hope it turns out!

See you next time. Pin It Now!

Sunday, 12 January 2014

Dragon and Girl: more WIP

The holidays were so busy and went by so fast! I had so much going on that I didn't get into the studio much to work on my Dragon and Girl piece, but I've been grinding away on it here and there.

I really think I'm close to the finish line now. Just a couplefew more paint layers on the dragon, the golden stain on the dragon and the girl's hair, coloured stains in the flowers, and finishing up various details here and there, and I'll be able to lead it up and declare this piece finished. What I'll do with it when it's done is another one to figure out. Maybe it will be the first piece I ever sell! (Wouldn't that be nice?)

Anyway, here are some photos of the progress I've made recently. These first two photos are from January 5th:


Progress as of 5 January 2014 - you can see that the body of the dragon is further along than the head and wings
Progress as of 5 January 2014

After the above, I went into the head and wings and strengthened the line, as the line work was quite a bit lighter than that on the body. There are also a couple more layers of shading in the face and wings. Here's where the piece was yesterday:


Progress as of 11 January

The round mark to the left of the dragon's face is just a screw in the light table surface underneath. You can see that the dragon's face and wing are further along, closer in colour and line to the dragon's body.

There's been more work to the girl's hair:

More shading added to the girl's hair and dress
And I've added more detail to the castle in the distance:

More detail added to the castle; more needed in the shrubbery
I need to add more detail to the shrubbery in front of the castle and darken the little pine trees I added to the castle. The shrubbery was put in because the acid had crept under the resist right there and caused the green glass to be marred. Just one of those things.

The dragon's face is coming along:

I wanted his expression to be ambiguous. What's does he think of this situation?
So, in general, I'm pretty pleased with the way it's coming along. I'm really jumpy now, worried that I'm going to drop a piece and shatter it, or screw it up somehow in some other way! Wish me luck, I'm really seeing the light at the end of the tunnel with this one.

Also, anyone wanna buy it? (Ha ha.) :D Pin It Now!

Monday, 2 December 2013

Dragon and Girl: More WIP Photos

So, more progress this weekend on the Dragon and Girl piece. I did another firing of the border pieces, but I finally also was able to do the first matte layer on the dragon's body, head, and wings. I also did the first matte layer on the little girl.

With matte layers, you lay on a thin layer of paint, then smooth it with your badger brush. (I always end up singing "Mushroom, MUSHROOM!" at some point when I'm using the badger brush.)

After that, you use other brushes to take paint away. Glass painting is the opposite of painting on mediums like paper or canvas: instead of laying paint on to make parts darker, you lay paint on in a flat coat and then take it away to add highlights. It takes a bit of getting used to.

Each matte layer of paint you add on the glass builds up and gives the piece depth, shadows, and a more 3-D look. Every new layer that's added has to be fired. So, keep in mind: this is just the first layer.

On with the pictures!


I'm really excited that this part of the piece is finally starting to come on. I just hope I don't screw it up! Pin It Now!